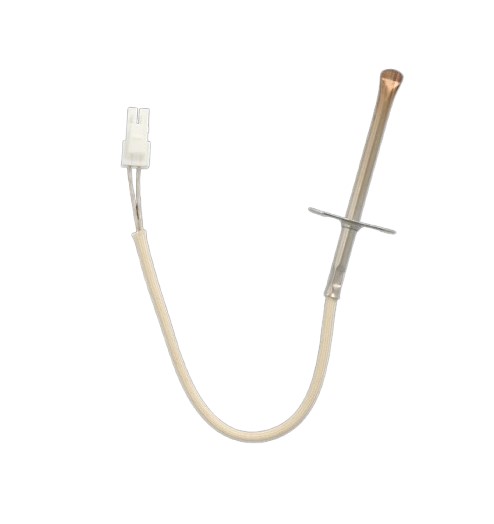

Fisher & Paykel 545259 Oven Temperature Sensor CYNTEC-3
$57.80
More Information:
This Part Fits the Following Models
31 models
Fisher & Paykel OD301MV2-88419 Wall Oven
Fisher & Paykel OD301MV2-87930 Wall Oven
Fisher & Paykel OD301MV2-87932 Wall Oven
Fisher & Paykel OB30DDEPX1-88491A Wall Oven
Fisher & Paykel OB30SDEPX1-88492A Wall Oven
Fisher & Paykel OD301 Wall Oven
Fisher & Paykel OD301MV1-87818 Wall Oven
Fisher & Paykel OD301MV1-87893 Wall Oven
Fisher & Paykel OD301V1-88415 Wall Oven
Fisher & Paykel OD301V2 Wall Oven
Fisher & Paykel OD301V2-87980 Wall Oven
Fisher & Paykel OD301V2-88423 Wall Oven
Fisher & Paykel OR30SDPWIX1-88660-A Range
Fisher & Paykel OR30SDPWSX1-88661-A Range
Fisher & Paykel OR30SDPWGX1-88659-A Range
Fisher & Paykel OS302A Wall Oven
Fisher & Paykel OS302M Wall Oven
Fisher & Paykel OS301V1-88416 Wall Oven
Fisher & Paykel OS301V2 Wall Oven
Fisher & Paykel OS301V2-87931 Wall Oven
Fisher & Paykel OS301V2-87933 Wall Oven
Fisher & Paykel OS301V2-87981 Wall Oven
Fisher & Paykel OS301V2-88420 Wall Oven
Fisher & Paykel OS301V2-88424 Wall Oven
Fisher & Paykel OS302 Wall Oven
Fisher & Paykel OD302 Wall Oven
Fisher & Paykel OD302A Wall Oven
Fisher & Paykel OD302M Wall Oven
Fisher & Paykel OS301 Wall Oven
Fisher & Paykel OS301MV1-87819 Wall Oven
Fisher & Paykel OS301MV1-87894 Wall Oven
No models found matching ""
Showing
of 31.0
Step 1: Disconnect Your Oven. Prior to changing your Fisher & Paykel 545259 oven temperature sensor, it is essential for your oven to be disconnected from the wall outlet to prevent any risk of electrical shocks.
Step 2: Identify the Sensor. After the oven has been disconnected, the sensor within the oven should be identified. It should be mounted on one of the side walls. The sensor's location should be remembered as it will need to be reattached post-replacement.
Step 3: Take Out the Sensor. With a screwdriver, the screws that secure the sensor should be taken out. The sensor should be gently extracted from the oven to avoid damaging any wiring.
Step 4: Position New Sensor. After the old sensor has been removed, the new sensor should be positioned in the identical spot. It should ensure that it is fastened using the screws that were previously removed.
Step 5: Attach the Wiring. The wiring should be carefully attached to the new sensor. It should be verified that each wire is connected securely to prevent any shorts in the system.
Step 6: Verify New Sensor. The oven should be reconnected and powered on. The new sensor should be verified by adjusting the oven to various temperatures and observing if it reacts correctly. If the intended temperatures are not reached by the oven, calibration of the sensor may be necessary.
Step 7: Secure Sensor. After the new sensor has been tested and its proper function confirmed, it can be secured back to the wall. The screws that were removed earlier should be utilized to firmly hold the sensor in position.
Please be aware that these instructions serve as general guidance and should always be utilized alongside the manufacturer's manual, if accessible.
Step 2: Identify the Sensor. After the oven has been disconnected, the sensor within the oven should be identified. It should be mounted on one of the side walls. The sensor's location should be remembered as it will need to be reattached post-replacement.
Step 3: Take Out the Sensor. With a screwdriver, the screws that secure the sensor should be taken out. The sensor should be gently extracted from the oven to avoid damaging any wiring.
Step 4: Position New Sensor. After the old sensor has been removed, the new sensor should be positioned in the identical spot. It should ensure that it is fastened using the screws that were previously removed.
Step 5: Attach the Wiring. The wiring should be carefully attached to the new sensor. It should be verified that each wire is connected securely to prevent any shorts in the system.
Step 6: Verify New Sensor. The oven should be reconnected and powered on. The new sensor should be verified by adjusting the oven to various temperatures and observing if it reacts correctly. If the intended temperatures are not reached by the oven, calibration of the sensor may be necessary.
Step 7: Secure Sensor. After the new sensor has been tested and its proper function confirmed, it can be secured back to the wall. The screws that were removed earlier should be utilized to firmly hold the sensor in position.
Please be aware that these instructions serve as general guidance and should always be utilized alongside the manufacturer's manual, if accessible.
Customer Reviews
No reviews yet. Be the first to write one!
Write a Review
Thank you! Your review has been submitted.